WOW! 🙂 I can not believe it has been one year! On February 14th 2016, I decided to do something wild and crazy…love me! I decided to do what makes me happy and get myself back.
I would often see others getting out there and doing their thing. I was a little envious. It must be great to know your God given talent and actually do it. I wanted to figure out where my talents lie. So, I tried a few things: baking, crocheting, and just making stuff. I was able to do it all; however, there was only one I LOVED. Making and crafting things! I always wanted to walk into Michael’s or somewhere and see people buying my stuff. Or designing some of those amazing stamp sets. How cool would that be?!
I did some research and found out that I need to put myself out there, in order to be seen. No better way to do that than a blog and social media…
So, Crafty Lotus was born! 11 posts published with 409 views, 262 visitors and 35 countries! That is AMAZING for MY1st year.
I have learned a lot over these 12 months. Time management (still working on this), business organization, personal growth…to name a few. I have learned a lot about myself as an artist, crafter, woman, mother and wife. I am learning to be accepting of myself and ALL my glory! 😉
Thank you to every- and anyone who has stopped and visited my blog, Crafty Lotus. It has been a great year. I am looking forward to many more!
Until next time….Keep Crafting!
It’s that time of the year when we all make resolutions to do something/anything positive for the new year. Then a few months into the new year, we say “Forget it. This is too much.” We’ve all done it. *Raises hand* I’m guilty of it too.
I have recently read a tweet from Ms. Iyanla Vanzant that resonated with me. “It’s time to set an intention for your heart’s desire. Then, put your attention on your intention.”
Usually in life, if we intend on doing something…we do it. “I intend on going to the store/mall/party/work.” It, for the most part, gets done. So, this year we should be making the BEST intentions for our life/careers/blogs. Then be sure to put our attention towards making it happen.
For me, what helps is to be able to physically SEE my intentions/goals.
My 2017 Goals/Intentions
By writing it down, I’m able to visualize and focus on my goals/intentions. Therefore, being able to put my attention on my goals. So, whatever your goal may be (more family time, get better at Copic coloring, learn new cardmaking techniques, etc), write it down and focus your attention towards it.
Here’s to a more focused year. 🍹 Cheers! Until next time…Keep Crafting!
As wedding season came around this year, a co-worker asked if I would create a wedding card for them. Of Course!!!! So, I thought of what I usually see when it comes to wedding cards…and did something different.
All I saw were doves, rings, bouquets, black/white and bells. I did, however, see something that sparked my interest-the use of ribbon to make a train of a bridal gown. “That’s cool”, I thought. So, I went from there.
Ingredients:
Bazzill cardstock (Dotted Swiss Sunset Rose)
Recollection cardstock (tan color from the seaside collection)
Vellum (clear)
2.25 inch Satin Ribbon (black and white)
1.5 inch Organza Ribbon (sheer white)
.25 inch Ribbon (blue)
Petite Swirl Rose (pink)
Close To My Heart ink (chocolate and brown paper bag)
rhinestones (3mm)
tiny beads (blue and silver)
hot glue
Scotch permanent clear glue pen
needle and white thread
ultra fine diamond glitter
I started off by drawing a silhouette of a bride holding a bouquet and a posing groom onto some tan cardstock. Next, I used my Close To My Heart inks to shade in the cardstock. I wanted to make the silhouettes resemble the skin tone of the actual couple. Since I do not have those cool ink blending tools, I used a makeup sponge….whatever works and gives you the results that you want 🙂
I started creating the bride first. I thought she would be the most challenging. I went with a mermaid style dress. I mean who doesn’t love a good curve hugging/creating kind of dress?! I sure do. That was the style of my dress. Using the white satin ribbon, I pleated the top of the dress to help create a lifelike bust. I ended up using a small flat iron to iron the pleats down and make them stay. Next, I began to wrap the ribbon around the silhouette to get that rushing affect. As I went, I made a stitch here and there to secure it in place. When I got to the bottom of the dress, I created some pick ups and stitched them as I went along as well. I really had to get my David’s Bridal on to type this portion of this post 😀 Now, what’s a bride without a little bling glam?! I gave her a belt using the sheer, white organza ribbon. I threw some rhinestones on the belt, and the dress, to help jazz it up. Doesn’t she just look amazing? Yaaassss!!
On to the groom we go. The groom actually turned out to be more of a challenge than the bride. Since the silhouette that I chose had a bent arm, I had to try to create natural looking creases at the arm folds. Also, each part of the tux had to be made with a separate piece of material–8 pieces total, which includes 2 pieces for the white shirt. I took care to add “seams”, black buttons (rhinestones colored black) and a tie. I chose a blue tie because of the wedding colors.
Bringing it all together. I put the bride and groom side by side. I noticed that the bride needed something blue to kind of match her groom. I found some small beads that were close to the same color as the groom’s tie. I added one silver bead in the middle for a diamond look. But wait! What is a bride without a bouquet to hold? I used two petite swirl ribbon roses for the bouquet. I had to stitch them in place to make sure that they stay exactly where I wanted them. For the card placement, I originally wanted the couple to be placed next to each other. But due to the volume of the dress, the groom had to be placed slightly behind the bride. I used hot glue to secure them to the card base, Bazzill cardstock. I used their embossed cardstock, dotted swiss, in Sunset Rose.
For the sentiment, I came up with something sweet to say. I then typed it up using a nice script font (in dark pink) and printed it onto the clear vellum. I adhered it to the card using a little clear glue. To complete the sentiment, I sprayed the interior of the card with some gloss and then quickly blew some ultra fine diamond glitter on to it. Wow! What a beautiful sparkle it gave the card. Not too much, just a dusting. Perfect!
I created my basic black envelope from a heavyweight black construction paper. Well not quite basic. I had to make the envelope stretch. So, I made the sides of the card using an accordion fold. Then I used a gold paint pen to write “Mr. & Mrs. Walker” in my best brush script lettering.
Hello Everyone!!! I don’t know how your weather has been. But here in Maryland–we are really feeling Spring. Can we sing together, “Rain, rain go away.” I’m a little over all of this dreary, rainy weather. Silver lining…Flowers! They can be so beautiful. All of the bright colors really bring life to everything.
This week is Staff/Teacher Appreciation week. It was suggested by the PTA, to have the students bring in flowers and cards to show our appreciation. So, I would like to give a big “Hip Hip Hooray” to all of the many teachers, professors and mentors all over the world. The ability to successfully and creatively mold minds, young and old, is a gift beyond measure. We salute you. You are truly appreciated.
I really liked the idea of flowers for my young children’s teachers…especially since they are all women. (For me, giving flowers to a man is a little strange. Just me.) However, it was rather late when I actually remembered the flower part. So, you know what that means–time to get crafty! Paper flowers, here I come.
After doing a little internet research, I decided on the hyacinth. They are bright in color and seemed to be the quickest to make. The supply list to create these wonderful flowers is so short-9 x 11 construction paper (green and any bright color), wooden skewers, glue and scissors.
First, I covered the wooden skewer in green construction paper. While it was drying, I vertically cut my colorful paper into strips (3 strips per sheet). Next, I created fringe on the strips. Be sure to leave about a 1 cm/0.5 inch edge.
If you have ever curled ribbon, this next step will be a breeze. Warning, don’t get too over zealous. You will lose a fringe or two. As you can see, I lost two. 🙂
Time to assemble the flower. Add glue to the uncut edge of your curly strip. Slowly wrap it around the skewer. Going too fast on this step will cause the paper to rip.
Lastly, your flower needs some foliage. Cut a thick strip of green construction paper and then roll it up. Cut a little off of each side. Leave about a 1 cm/0.5 inch edge. You are trying to make it resemble a leaf. I used about 5 blades for each flower.
Voila! Paper Hyacinth. All of the teachers absolutely loved them. This would also be cute for Mother’s Day or just any day. A great idea for someone who can not have real flowers (hospitals) but love them.
It’s time to party!! Birthday Fun = Card Making fun.
For birthday cards, I try to personalize and customize them according to the individual. I also like to try out a new style or trend. So, here are 3 birthday cards that were waiting to make an appearance:
– A Shaker card for my Husband
– A Coloring Special
– A Glitterific Cut-out card
For my husband’s card, I decided to go with his favorite car (Cadillac) and color (green). Since Cadillacs are classic—I thought about other classics: Polaroids, music (Hip Hop), silver/white gold.
The shaker card was a little tricky because I wanted to be creative and different. Oh and I ran out of mounting tape!! Yay. Good thing I have kid stuff in my craft section! I found some thick, green, star shaped, foam stickers. I strategically cut them up and hot glued them into place. Creative, right?! After figuring that out, the rest was a breeze. I added a few small green and silver beads, and some silver, star confetti. I finished it with a handpainted, brush lettering sentiment in silver. I used lyrics from the song Classic Man by Jidenna. Perfect! He absolutely loved it!!
Can you see the beads and confetti?
Front view Shaker Card
Next up, Shopkins! Shopkins + Adult coloring time = One Awesome Card.
One of my oldest son’s classmates loves Shopkins. I totally can NOT see why. Tiny miniature food with faces is a little creepy—very different from my childhood toys. But hey—whatever. I went to the Shopkins website and printed the Wise Fry and Cheddar characters on some white cardstock. I then grabbed my Crayola pencils and began some of my best coloring. The colors…the blending—Just Fabulous!
My son chose the burger, Cheddar, to go on her card. We then glitter bombed the card base with some large, tangerine-iris colored glitter to add more pop and texture. I had to hot glue the pieces onto the card due to the glitter. Sticking stuff on top of glitter can be tricky. This card turned out to be so cute and tasty.
Milli Measure! So, that cute little girl from Team Umizoomi , Milli, is a favorite for most little ones age 2 to 5.
My youngest son and family were invited to a birthday party for a little girl turning 2. So, he picked out Milli from Team Umizoomi for her. I wanted to try something a little different with this card. Instead, of the traditional folded card—I did a cut-out of sorts.
After coloring Milli, I glued her down onto some Crayola Color Surge Paper. I really loved the bright colors of this paper and it is dual sided. I glued her to the turquoise side. The other side is a bright magenta. I cut out some spikes/zig-zags and saved the scraps for later use on the card. Once the spikes were finished, I glued her onto some shiny, textured Bazzill Basics cardstock. I used the bright magenta scraps to give a cool contrast to the turquoise background. I added a script style number 2 to the bottom corner to balance the card.
To really make things pop, I added sparkle to Milli’s hood, dress and shoes using my homemade “Wink of Stella” (aka Mod Podge and iridescent glitter). I glittered up the number 2 with a FABULOUS purple!
Well, that’s all of the Birthday Cards for now. Until next time…..Keep Crafting like it’s 1999 (Rest In Purple, Prince)!!!
HELLO WORLD!!!! I’m back. I know that it has been a long time since my last post. I just needed to take a break. I was exhausted and in need of a time out. With being a mom of 3, a wife and a new blogger–life was a little hectic. I wanted to make sure that I was posting something worth while on a regular basis (weekly to start). It became a little overwhelming. I was having some really late nights; which in turn led to late mornings. ¡No es bueno en absoluto!
That told me that it was time for a little break. Time to re-focus. So, I did. I was nervous though. I thought that I would lose some viewers. But I see I actually gained a few more. Thank you for that 🙂 I realized that I need to work on my time management skills. I mean…couldn’t we all use a little help in that area?! I need to set up boundaries and create a balance between work, family and my blog. I guess it’s time to join that Planner Life! 😉
I decided to try to come up with some crafts that fit into my life. Before, I was just trying to craft and create anything. I think as a newbie blogger, you kind of have to do what fits in with your lifestyle. As you get further down that blogger road, you will be able come up with ideas to craft/create with less stress and worry. It will become easier…I hope. Now, I will take a look at the coming weeks ahead and see what bests fits.
Even though I was taking a break from the blog, I was not on break from life. My kids were actually on their Spring Break. So, when there is no school, I try to keep them occupied with craftivities! We made Papier-mâché Easter eggs. The kids had so much fun making and smashing them (mini piñata meets baseball bat)! And I also made a shaker birthday card for my wonderful husband.
Blogging this way should alleviate some of my blogging stress for now. I figure, over time this blogging thing will get easier and less stressful. I have to remember that I am still a newbie at this. As they say, Rome wasn’t built in a day.
Here are a few pictures from my “Spring Break.”
Bundt Carrot Cake
Papier-mâché eggs
Painted Papier-mâché eggs
Have you had any blogging whoas or time management issues? Leave me a comment and let me know.
Have you ever started thinking about your next craft project and thought, “Man. I need to go buy ___” or “I can’t do this project because I need ___.” That’s exactly where I was. I know we all wish we had an endless budget when it comes to our craft rooms and supplies. (I know my room would be more like a Craft Apartment! Soo many rooms. Soo many supplies.)
As a family of five, budgeting is key. Some months you can go out and get that new stamp set, inks, tools or whatever. Other times you can not. That is when you have to think outside the box. Shop your supplies.
This week, I wanted to do some Spring/Easter inspired cards. All of my local craft stores (Michaels, AC Moore, Jo-Ann fabrics) were having some amazing Spring sales. All of the new Spring releases! The temptation was REAL! However, this month I am on a budget–which means no extra, “just-gotta-have-it” craft supplies. 😦 What is a girl to do? Use what you have and think outside the box. After all, Spring is a time for new and fresh ideas (not just supplies).
Shop your supplies! Go through your existing craft supplies. You will be amazed at how much stuff you actually have and all the supplies/tools you forgot about. Be sure to keep an open and fresh mind. Look for that one thing that catches your craft eye and go from there. It could be anything–patterned paper, die cuts/cartridges, stamp sets, stencils, colors or tools. We all have stuff that that we have purchased with the thought of “Oooh! This will be real cute for something.” And never used it. Well, today is the day to use that something, try out that new technique or use that tool.
So, I have the Cricut Rock Princess cartridge that I found on clearance one weekend. I have been dying to use it for a craft project. I know what you’re thinking, “How are you getting Springtime from Rock Princess?!” There are some really cute shapes on this cartridge. It has some flowers, butterflies and some cute rock princesses. It’s just a matter of thinking in a new light/view. Come at Springtime from a different perspective.
Here We Go!
I am going to do 2 cards-Religious Easter and fun Easter.
Supplies:
Bazzill Basic Paper cardstock
Recollections cardstock paper
Jen Wilson La Paperie-My Mind’s Eye patterned paper
DCWV The Music Stack cardstock
Cricut cartridges: Doodlecharms and Rock Princess
colors: acrylic paint, colored pencils and Marvy Brush Markers
For the fun Easter card, I wanted to do something other than the usual basket full of eggs
Layers of the shoe
and animals. I wanted something fun and funky! I thought of Converse All-Star hi-tops. I cut out a shoe from the Cricut Rock Princess cartridge.
Some egg-citing coloring
I picked out this really cute, Spring-like floral print from the DCWV-The Music Stack cardstock. I used the Cricut Doodlecharms cartridge to cut out the eggs. I chose a few large eggs and lots of little eggs. After jazzing up the eggs and the hi-top, I figured out the placement of everything on the card. I
The finished shoe
added a light blue background that I water colored.
The finishing touches for this card
Final Fun Easter Card
were the sentiment and butterfly. I used acrylic paint for the sentiment and a marker watercolor technique for the butterfly.
For my Religious Easter card, I chose my sentiment first. When I think of the word rejoice, I image dancing. Doing a happy dance. So, I chose “Kim” from the Cricut Rock Princess cartridge.
Plain Kim
Jazzed up Kim
I jazzed “Kim” up and gave her life with some acrylic paints.
For the sentiment, I chose a background of a nice shade of yellow. I did some brushlettering/calligraphy with some Titanium White acrylic paint. Once dry, I went over it with a fine gold glitter and Mod Podge mix. My homemade version of the Wink of Stella pen. 😉 Then just printed the rest of the sentiment with a Navy Blue Marvy Brush Marker.
To put it all together, I trimmed the down the sentiment paper with these
Final Religious CardFun Trimming Scissors
fun scissors. It just added a little something extra. Then I “popped up” Kim with my foam tape.
Do you know someone in the Navy or Marines? If so, then you have seen one of those cool paddles. Well, I was challenged with getting one for someone that is separating from the Navy. Man are those things pricey! They range between $75 and $200. I just knew that there must be a less expensive paddle out there some where. After some research, the answer is NO! So, you know what that means…time to get my craft on!!!
During my research, I looked at several pictures of paddles online. Some were very intricate with words within the paracord wrapping, and others were very simple. I also noticed that some of the paracord wrapping was nothing more than friendship bracelet making. Do you remember making those in school? I do.
Supply List:
3 ft Wooden Paddle
Parachute 550 Cord (Navy Blue and Gold)
E6000 Clear Flexible Industrial Strength Adhesive
Krylon UV-Resistant Clear Acrylic Coating
random orbital palm sander
adornments (i.e. pins, coins, ribbons, etc.)
First, I came up with a design for the neck of the paddle. I went with the traditional Navy
The paddle before
colors of Navy Blue and Gold. I wanted something a little fancy for the wrapping. I went with a two-colored, double spiral and two 5×4 Turks Head knots. Secondly, I had to come up with a design for the face of the paddle. I collected some items to adorn the face of the paddle–pins, coins and ribbons. I also had a little plague engraved with the Sailor’s name, rank and a nice sentiment.
The face of a paddle is curved. So, to start, I had to sand down the places for
Sanded down areas
the adornments to go. You definitely can NOT put a FLAT object neatly on a CURVED surface–trust me. I surely gave it a try. 🙂 While, I had the sander out I smoothed out a few rough spots on the handle, sides and back. This is also a necessary step in order to properly adhere the objects to the face of the paddle.
The paracord wrapping was rather easy for me. I guess all those years of making friendship bracelets really paid off! Now, that 5×4
Turks Head knot?! I must have tried to tie that knot about 11 times before I was finally successful at it. So, of course the second Turks Head knot was no problem at all.
Double Spiral
5×4 Turks Head knot
Now time for the gluing process. I used some E6000 Industrial Strength adhesive to adhere the adornments to the face of the paddle. This was a little tricky. I have never personally used E6000 before. I had no idea of how slick it was! I thought it would be tacky, like most adhesive. I was wrong. So, what I had to do was to apply some heat–a blow dryer. I glued the pieces down and then turned on the blow dryer. I positioned it to where it would be able to blow heat on the pieces while I held them in place. I held them in place with the
Some weights added to hold down
heat for about a minute and a half. I let the pieces finished curing overnight. I had to place a 10 pound kettlebell weight on top of it overnight. This was to ensure that the pieces did not pop up or off during the curing process. The curing time for the E6000 adhesive is at least 24 hours–72 hours for maximum hold/curing. Oh, I also put a little of the adhesive on the Turks Head knot to secure them in place. Don’t need them moving all over the place. 🙂
Once everything was done, I added my logo (advertising and marketing :-)) to the back of
Back view of paddle
the paddle. I sprayed the handle and paddle face with about five coats of clear, glossy acrylic coating. Voilà –one awesome Navy
Finished Paddle
paddle!! Can’t wait to see the Sailor’s face when he lays eyes on this.
February is now coming to a close. Is anyone else a little excited for Spring?! Unless you suffer from allergies-which sucks. Time to open up the windows and invite in new, fresh ideas. It’s a time for Easter celebrations and Spring season sports-that’s soccer for my household. (Soccer moms unite! :-))
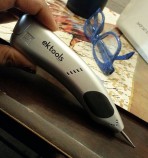
My EK Tool engraver
How about engraving for new and fresh? I received an EK Tools cordless engraver as a Christmas gift from my husband. How cool is that? I have never engraved anything in my life. He just saw it in the crafting tools aisle and grabbed one for me. So, like a kid, I
Always Coca-Cola
immediately started grabbing any and every thing to see if it was engravable. I tried it out on rocks, plastic tupperware, a ceramic mug, a pencil, a glass and a key. I have not used it since…until recently.
When you put it out there in the Universe that you want to try something or refrain from something; it seems that you are given several opportunities to try and excel in that arena. So, I put out there that I want to do more crafting and opportunities galore showed up. Engraving happened to be one of the many arenas.
Mug before
I went out to the mall to pick up a nice going away gift. I decided on a couple of Contigo travel mugs in blue. I had them engraved with a Navy emblem. I asked about having some words added. At $10 per word that sent the price of the mug up to almost $60! There was no way I was going to pay almost $120 for two travel mugs. So, DIY to the rescue!
Final Engraving
First, I found a picture of the saying that I wanted in a brush lettering style-Fair Winds and Following Seas. Next, I penciled it onto the mugs and added an anchor to either side. Finally, I traced it with my engraving tool. It turned out rather nice. Hopefully, the recipients enjoy their custom travel mug.
My oldest son was recently invited to a birthday party for one of his classmates. The little girl was turning 6. We received a Disney Frozen themed invitation. So, what better way to work on your card making skills than to make cards for your children’s classmates/friends. I mean advertising, networking and marketing has to start somewhere, right?! 🙂
Frozen has some great characters to work with–Elsa, Ana, Olaf, Kristoff and Sven. Not sure which character is this little girl’s favorite. So, I will be choosing Olaf. I mean who doesn’t love Olaf?! He’s so funny and cute. “In Summmeerrrr!” in my Olaf singing voice.
Since the classmate is a little girl; I will be sure to sparkle it up! What girl doesn’t love a little sparkle? I know I do.
I start off by finding a cute picture of Olaf. I am going with the iconic leaping Olaf. I decided to have him wearing a birthday hat and have balloons and snowflakes around him. On the outside, I will write my sentiment and have “Happy Birthday” on the inside.
Here is my supply list. Shout out to:
Bazzill Basic cardstock- heavyweight, textured paper for card base (PetalSoft) and lighter, smooth cardstock for Olaf (I love their cardstock. They have so many colors and textures to choose from.)
Marvy Brush Marker primary set
Crayola colored pencils (I love Crayola stuff.)
Close To My Heart
My Legacy Writer Set-Black, 0.1mm and 0.5mm
Exclusive Inks-Pink Carnation and Orchid Bouquet
Mod Podge gloss (This is some amazing stuff. Love it.)
Acrylic paints: Apple Barrel (Red Apple, Pumpkin Orange) , Americana (Snow Titanium White), CraftSmart (Bright Yellow, Blue)
3M double sided mounting tape (The tape that makes things “pop.”)
Glitter (white/iridescent)
Disney’s Frozen…Thanks Disney for making this amazingly cute snowman, Olaf.


 she would be the most challenging. I went with a mermaid style dress. I mean who doesn’t love a good curve hugging/creating kind of dress?! I sure do. That was the style of my dress. Using the white satin ribbon, I pleated the top of the dress to help create a lifelike bust. I ended up using a small flat iron to iron the pleats down and make them stay. Next, I began to wrap the ribbon around the silhouette to get that rushing affect. As I went, I made a stitch here and there to secure it in place. When I got to the bottom of the dress, I created some pick ups and stitched them as I went along as well. I really had to get my David’s Bridal on to type this portion of this post 😀 Now, what’s a bride without a little bling glam?! I gave her a belt using the sheer, white organza ribbon. I threw some rhinestones on the belt, and the dress, to help jazz it up. Doesn’t she just look amazing? Yaaassss!!
 On to the groom we go. The groom actually turned out to be more of a challenge than the bride. Since the silhouette that I chose had a bent arm, I had to try to create natural looking creases at the arm folds. Also, each part of the tux had to be made with a separate piece of material–8 pieces total, which includes 2 pieces for the white shirt. I took care to add “seams”, black buttons (rhinestones colored black) and a tie. I chose a blue tie because of the wedding colors.

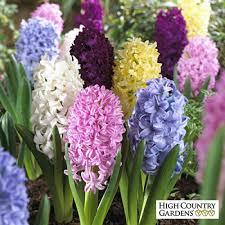 After doing a little internet research, I decided on the hyacinth. They are bright in color and seemed to be the quickest to make.
  The supply list to create these wonderful flowers is so short-9 x 11 construction paper (green and any bright color), wooden skewers, glue and scissors.


 he picked out Milli from Team Umizoomi for her. I wanted to try something a little different with this card. Instead, of the traditional folded card—I did a cut-out of sorts.